¶ Overview
The first layer is key to a successful 3D print. In this guide, you’ll learn step by step how to make it stick to the bed by adjusting Z-offset, temperature, print speed, and bed preparation. Small, careful tweaks make a big difference. Always watch the first layer to catch issues before wasting time on a full print.
¶ Tuning Your First-Layer Print Settings
1. Speed
Recommended: 20–40 mm/s for the first layer, 50-70 mm/s for the initial layer infill.
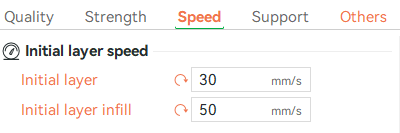
Why it matters: Slower speeds give the filament time to stick to the bed and spread evenly.
2. Initial Layer Height
Recommended: 45–75% of your printer’s nozzle diameter.
Example: For a 0.4 mm nozzle, 0.2–0.3 mm works well; a middle-ground layer of 0.2 mm is often a safe choice.
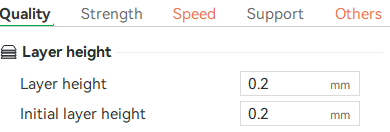
Why it matters: Slightly thicker layers improve adhesion and tolerance for small leveling errors. Thinner layers improve surface detail but may reduce bonding.
3. Flow Rate
Recommended: Increase first-layer flow by ~5%.

Why it matters: Slight over-extrusion fills gaps between lines and helps the filament stick firmly to the bed.
4. Temperature
Nozzle: Set the first-layer nozzle temperature 5–10 °C higher than the rest of the print. Higher temperatures help the filament flow and reduce under-extrusion.
Example: PLA: 210 °C (first layer 215–220 °C), ABS/PETG: 230–250 °C.
Bed: A warmer bed prevents thermal shock and warping (See the Material-Specific Build Plate Temperature section for more details).
Example: PLA: 40–60 °C, PETG: 80–90 °C, ABS: 80–100 °C.
5. Bed Preparation
What to do: Use a bed surface compatible with your filament. Then, clean the bed with IPA and apply a thin glue layer for PETG, ABS, ASA, or large prints.
Why it matters: Improves adhesion and makes prints easier to remove.
6. Brim, Skirt, and Raft
These are optional but helpful tools to improve first-layer adhesion, especially for tricky materials or small prints:
Skirt: Prints around the model but not touching it.
Use when: You want to prime the nozzle and check filament flow before printing.
Brim: Prints around and touches the model.
Use when: The model has a small contact area, or for tricky filaments like ABS or PETG. Increases surface area to prevent lifting.
Raft: Prints a full layer under the model.
Use when: Small or delicate prints are difficult to stick, or the surface is uneven. Be aware it uses extra material and takes longer.
7. Cooling
Keep part-cooling fans off or very low for the first 2–3 layers.
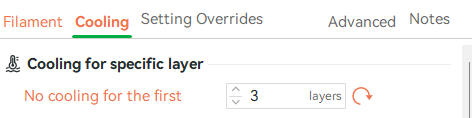
Why it matters: Cooling too early can cause filament shrinkage and lifted corners. Let the first layers solidify before active cooling.
Material-Specific Build Plate Temperature
| Material | Build Plate Temp (°C) |
|---|---|
| PLA | 50–60 |
| PETG | 70–80 |
| TPU | 50–60 |
| ABS / ASA | 80–100 |
| Nylon | 50 |
| PC | 90 - 105 °C |
Common First-Layer Issues and Quick Fixes
| Symptom | Likely Cause | Practical Fix |
|---|---|---|
| Corners lifting / warping | Z-offset too high or bed temp too low | Lower Z-offset slightly. Raise bed temp 5–10 °C. Apply glue or brim for large/high-temp materials. |
| Model detaches mid-print | Dirty bed or unstable temp | Clean with IPA. Ensure heater maintains steady temp. Avoid drafts. |
| “Elephant’s foot” (bulging base) | Nozzle too close or bed too hot | Raise Z-offset 0.05 mm at a time. Lower bed temp 3–5 °C if needed. |
| Gaps / poor bonding | Z-offset too high or under-extrusion | Lower Z-offset slightly, increase first-layer flow ~5%, reduce first-layer speed. |
| First layer sticks too much | Bed too hot, smooth surface, or Z-offset too low | Lower bed temp 5–10 °C, raise Z-offset slightly. Glue can act as a release layer. |
Quick Pre-Print Checklist
- Clean the bed with IPA.
- Check bed leveling or mesh calibration.
- Match the Build Plate type and temperature to your filament type.
- Apply a thin glue layer if you are printing large prints.
- Keep first-layer speed ≤ 50% of normal speed.
- Turn off your cooling fan for initial layers
- Add Brim, Skirt, and Raft when necessary